Pitching
Mechanics Explained
Home Page | Upper Arm and Elbow
Structure | Exercises for Pitchers
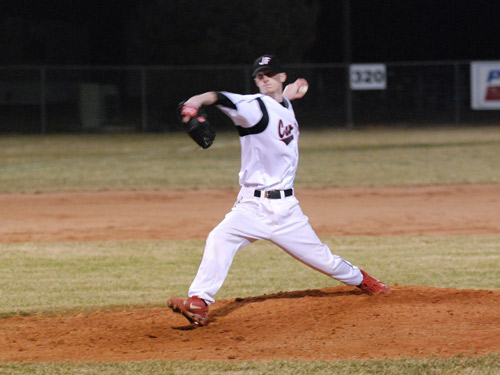
Pitcher at the "Power Position" Proper Mechanics
Figure 1 Source: Edward Sanderson. 26 May 2010 <
http://www.edwardsanderson.phanfare.com/4594876_5065134#imageID=94857654
>.
The pitching sequence can be broken down into five or six independent
parts.
- Stand Tall but relaxed.
- Slight step backward of the pitching rubber. (Opposing leg to
throwing arm)
- Come to a balance position. (Normally involves a leg kick in the
wind up position)
- Separation point. (Depicted in proper form above)
- Power Position. (Glove is drawn in to the chest)
- Follow through to fielding position.
This high school varsity pitcher has excellent form. This balance
position shows the throwing elbow is at or slightly above the shoulder.
The glove hand is relaxed and is being drawn "Glove to Chest" as the
torso begins rotation toward home plate. The feet are in good position,
the only real flaw in this picture is that he is landing on his heel
instead of softly landing on the inner big toe area. Landing on the
heal can cause a jarring effect which can cause the pitch not being
located where it is desired. This is called "Missing your spot."
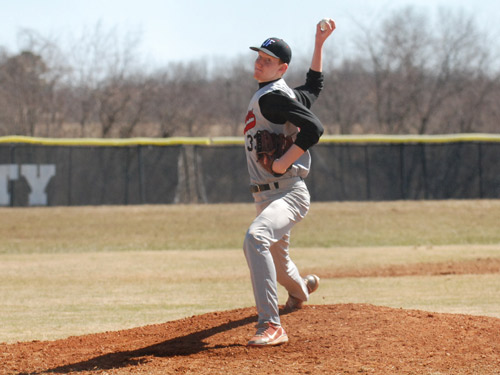
Pitcher at the "Power Position" Poor Mechanical Position
Figure 2 Source: Edward Sanderson. 26 May 2010 <
http://www.edwardsanderson.phanfare.com/4591117#imageID=94617449 >.
Some pitchers (see figure 2) with extreme height at an early age may
have more difficulty combining all the mechanical aspects to achieve
maximum velocity because the body does not move as fluidly. This
pitcher at nearly 6’ 8” has great potential, but several things need to
be corrected by proper timing in hopes of preventing needles injury.
The following points can be observed in this photograph concerning the
balance point:
- All energy has been transferred to the front leg, even before
separation starts to end. This makes the wind up useless.
- The torso has already started to rotate while dragging the arm
behind. Extreme pressure is being placed to the rotator cuff. This
creates an "all arm" pitcher.
- The glove hand is already contracted to the chest before
transferring to the "Power position."
- Working from the feet up. The entire timing process is wrong.